OPC is pleased to announce, Meissa Fitzmorris - Outdoors/Nature photography. Check out her current work on our site http://www.outdoorpursuitscanada.com/categories/Artwork/
More pieces will be available in the future, and all prints are fully customizable.
Thursday, August 4, 2011
Tuesday, July 26, 2011
Recipe Time! - Grilled Halibut Thai Style
Recipe from Alberta Outdoorsman magazine
This is a very good recipe for grilled halibut adapted from the ATCO Blue Flame Kitchen Romancing The Flame (2004) Cookbook, which has a distinct Thai flavour and a mouthwatering aroma. It's a great recipe for a late season BBQ to finish off your summer's halibut catch.
INGREDIENTS:
I served the grilled halibut steaks with carrots glazed with balsamic vinegar. Make lots of carrots; they'll go fast. I also prepared some boiled, garden fresh white potatoes and some balsamic baked tomatoes. Scrub or peel the new potatoes and gently boil them for 1/2 hours, in scalding-hot water with 1/2 teaspoon of salt. Drain well and set aside in a covered Pyrex bowl.
I used the following ingredients for the balsamic baked tomatoes recipe:
Next, sprinkle the tomatoes with the bread crumb mixture as a topping. Bake at 350 F for 30 minutes until the tomatoes are tender and the bread crumb topping is crisp and browned. Remove the baked tomatoes from the baking dish with a spatula to a serving platter. There won't be any leftover tomatoes.
Overall, the grilled halibut, carrots, tomatoes and potatoes make for an excellent meal, which will be a hit with everyone.
Serve with a bottle of dry white wine or a beverage of your choosing.
Bon appetite!
This is a very good recipe for grilled halibut adapted from the ATCO Blue Flame Kitchen Romancing The Flame (2004) Cookbook, which has a distinct Thai flavour and a mouthwatering aroma. It's a great recipe for a late season BBQ to finish off your summer's halibut catch.
INGREDIENTS:
- 1/2 cup chopped fresh cilantro
- 1/4 cup olive oil
- 3 tablespoons fresh lime juice
- 1/2 teaspoon red pepper flakes
- 1/4 teaspoon salt
- 1 clove garlic (pressed)
- 4 small (or 2 large) halibut steaks
I served the grilled halibut steaks with carrots glazed with balsamic vinegar. Make lots of carrots; they'll go fast. I also prepared some boiled, garden fresh white potatoes and some balsamic baked tomatoes. Scrub or peel the new potatoes and gently boil them for 1/2 hours, in scalding-hot water with 1/2 teaspoon of salt. Drain well and set aside in a covered Pyrex bowl.
I used the following ingredients for the balsamic baked tomatoes recipe:
- 1 cup fresh bread crumbs
- 2 tablespoons olive oil
- 1 clove garlic (pressed)
- 1 teaspoon thyme (crumbled)
- 1/2 teaspoon salt
- 1/4 teaspoon freshly ground pepper
- 8 tomatoes (preferably Roma) halved, or quartered (lengthwise) depending on size
- 1 tablespoon balsamic vinegar
Next, sprinkle the tomatoes with the bread crumb mixture as a topping. Bake at 350 F for 30 minutes until the tomatoes are tender and the bread crumb topping is crisp and browned. Remove the baked tomatoes from the baking dish with a spatula to a serving platter. There won't be any leftover tomatoes.
Overall, the grilled halibut, carrots, tomatoes and potatoes make for an excellent meal, which will be a hit with everyone.
Serve with a bottle of dry white wine or a beverage of your choosing.
Bon appetite!
Saturday, July 23, 2011
Razor Sharp!
How To Hone a Hunting Knife Into Something You Can Shave With
(story by Keith McCafferty - Field & Stream - March 2011)
BY NOW JUST ABOUT everyone has heard of 127 Hours, the critically acclaimed movie inspired by Aron Ralston, the climber who was pinned by a boulder in Utah and spent an hour sawing his arm off with a dull knife blade. It's a dramatic film, but I don't think moviegoers would have had to close their eyes for as long if Ralston had carried a pocket hone in his pack, or even a piece of fine-grit sandpaper.
Sharpening a knife so that it is keen enough to sever your limb, or, less drastically, skin and butcher a deer, really isn't that difficult. All you really need to render a serviceable edge is a stone, a little spit and a steady hand, and even the spit is debatable.
True Grit Traditional bench stones have largely been supplanted by diamond-encrusted surfaces and synthetics including ceramics and Japanese water stones. I still prefer a good Arkansas bench stone, but as a rule the type of stone is not as important as its grit equivalent. One that sports a medium-coarse grit (325 to 400) on one side and medium-fine 600 grit on the other will cover most sharpening bases. Grandpa invariably prepared his stone with oil, on the assumption that it was needed to "float" away metal particles during honing. Today, many experts recommend using water or no lubrication at all. Shell out the extra sawbuck or two for a bench-size stone about 2 1/2" wide by 8 inches long. It will have a more substantial surface that will sharpen a blade more evenly than a smaller stone.
Bevel and Burr Most hunting or utility knives are ground to an edge bevel of about 20 degrees. The easiest way to maintain that angle is with a blade guide that clamps over the knife's spine. Drink decaf to keep a steady hand and you won't need a guide for blades shorter than 4 inches. Place the edge against the stone at the correct angle and use either your thumb or two fingers on the back of the blade to guide it. With light pressure, push the blade away from you, imagining that you are slicing off a thin sliver of the stone.
Keep sharpening the same side, counting strokes, until a thin ridge of steel, called a burr, is raised on the other side (you can feel it by running your finger past the edge). This means you've ground the bevel completely flush with the stone. Only then should you turn the blade over.
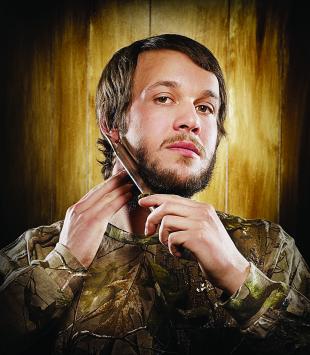
Using the identical number of strokes, repeat the process on the other side. The blade should now be sharp enough to catch on your thumbnail and shave hairs off your forearm. If you use your knife mostly for slicing cuts - field dressing, butchering, cutting cord and wood - stop right now. The medium coarse stone leaves microserrations in the steel that give it more edge surface and bite for performing general camp chores. For whittling and skinning, particularly fine detail work like caping a head for a trophy mount, or if you just want to show off by shaving your beard, you'll need to progress to a finer-grit stone.
Finishing Touch To render your blade razor sharp, repeat the procedure with a 600-grit stone surface. This removes some of the microserrations left by the coarser stone. Afterward you can polish the edge even keener with a 1,200-grit stone or a leather strop, which I prefer. Prepare the strop - a wide leather belt will suffice - with a one-time application of a rubbing compound such as aluminum oxide. Place the blade nearly flat against the strop with the edge facing you and stroke the blade down its length, spine first. Flip the blade over and draw it back up. A dozen reps should do it.
I recommend supplementing your bench stones with a lightweight field sharpener. It's just the ticker for touching up an edge when you're halfway done boning an elk - or you need to get through that last inch of gristle an muscle that attaches your hand to your forearm.
Check out our extensive selection of sharpeners!
http://www.outdoorpursuitscanada.com/categories/Sharpening-Systems/
We have everything from Japanese bench stones to lightweight pocket sharpeners to deluxe diamond systems!
(story by Keith McCafferty - Field & Stream - March 2011)
BY NOW JUST ABOUT everyone has heard of 127 Hours, the critically acclaimed movie inspired by Aron Ralston, the climber who was pinned by a boulder in Utah and spent an hour sawing his arm off with a dull knife blade. It's a dramatic film, but I don't think moviegoers would have had to close their eyes for as long if Ralston had carried a pocket hone in his pack, or even a piece of fine-grit sandpaper.
Sharpening a knife so that it is keen enough to sever your limb, or, less drastically, skin and butcher a deer, really isn't that difficult. All you really need to render a serviceable edge is a stone, a little spit and a steady hand, and even the spit is debatable.
True Grit Traditional bench stones have largely been supplanted by diamond-encrusted surfaces and synthetics including ceramics and Japanese water stones. I still prefer a good Arkansas bench stone, but as a rule the type of stone is not as important as its grit equivalent. One that sports a medium-coarse grit (325 to 400) on one side and medium-fine 600 grit on the other will cover most sharpening bases. Grandpa invariably prepared his stone with oil, on the assumption that it was needed to "float" away metal particles during honing. Today, many experts recommend using water or no lubrication at all. Shell out the extra sawbuck or two for a bench-size stone about 2 1/2" wide by 8 inches long. It will have a more substantial surface that will sharpen a blade more evenly than a smaller stone.
Bevel and Burr Most hunting or utility knives are ground to an edge bevel of about 20 degrees. The easiest way to maintain that angle is with a blade guide that clamps over the knife's spine. Drink decaf to keep a steady hand and you won't need a guide for blades shorter than 4 inches. Place the edge against the stone at the correct angle and use either your thumb or two fingers on the back of the blade to guide it. With light pressure, push the blade away from you, imagining that you are slicing off a thin sliver of the stone.
Keep sharpening the same side, counting strokes, until a thin ridge of steel, called a burr, is raised on the other side (you can feel it by running your finger past the edge). This means you've ground the bevel completely flush with the stone. Only then should you turn the blade over.
Using the identical number of strokes, repeat the process on the other side. The blade should now be sharp enough to catch on your thumbnail and shave hairs off your forearm. If you use your knife mostly for slicing cuts - field dressing, butchering, cutting cord and wood - stop right now. The medium coarse stone leaves microserrations in the steel that give it more edge surface and bite for performing general camp chores. For whittling and skinning, particularly fine detail work like caping a head for a trophy mount, or if you just want to show off by shaving your beard, you'll need to progress to a finer-grit stone.
Finishing Touch To render your blade razor sharp, repeat the procedure with a 600-grit stone surface. This removes some of the microserrations left by the coarser stone. Afterward you can polish the edge even keener with a 1,200-grit stone or a leather strop, which I prefer. Prepare the strop - a wide leather belt will suffice - with a one-time application of a rubbing compound such as aluminum oxide. Place the blade nearly flat against the strop with the edge facing you and stroke the blade down its length, spine first. Flip the blade over and draw it back up. A dozen reps should do it.
I recommend supplementing your bench stones with a lightweight field sharpener. It's just the ticker for touching up an edge when you're halfway done boning an elk - or you need to get through that last inch of gristle an muscle that attaches your hand to your forearm.
Photo Credits: Field & Stream
Check out our extensive selection of sharpeners!
http://www.outdoorpursuitscanada.com/categories/Sharpening-Systems/
We have everything from Japanese bench stones to lightweight pocket sharpeners to deluxe diamond systems!
Thursday, July 21, 2011
Time to Kill
To consistently punch tags, you need to shoot quickly and accurately.
By David E. Petzal - (Story Source: Field & Stream - March 2010)
In 2006, After two weeks of slogging through the bogs of Southern Alaska, I finally got a chance to drop the hammer on a bull moose. The enraged ungulate was approaching at a rapid trot. I was out in the open, and if I moved, he would see me. This meant that as he came abreast I would have to mount the rifle, aim, and get the shot off in the space of a second or two before he figured out that something was amiss, or amoose, as it were. I did, and he learned too late that the best-laid plans of moose and men gang aft agley.*
What's the Rush?
Sometimes you have to shoot fast. Not only that, but you have to be able to hit what you're shooting at. Guides and outfitters whine that far too many hunters these days are no more capable of getting off a fast, accurate shot that they are of flying. One outfitter told me, as he approached apoplexy, "You work your butt off to get them a perfectly easy offhand shot, and they look around for a benchrest."
In areas where the game population is hunted hard, or where you will have to shoot at close range, you had best fire right smartly. On the other hand, there are places where the critters are more curious than concerned about humans. If you're one of the growing number of nimrods who shoot at over 300 yards, you probably have time for a leisurely first shot and two or three more as well.
Get in Touch With Your Inner Earp
Wyatt Earp, who died in his bed at 80, summoned up the art of fast shooting to perfection. When you slap leather, he said, you get your revolver clear of the holster just as fast as you possibly can, but then you take your sweet time aiming.
Translated into rifle shooting, this means getting the gun to your shoulder quickly, with no wasted motion, all the while keeping your eyes on what you want to shoot. Remember that you don't yank the stock straight up; you bring it forward, up and back in a short semicircle.
When you gun is up and you are aiming, you have to make a fundamental decision: How much time do I have? Experienced hunters can judge by an animal's behavior whether they have no time at all, or five seconds, or five minutes. Whatever time they think they have, they will take all of it.
If you're not an experienced hunter, it's better to assume you have no more than three seconds. So, pick a spot on the critter, aim for it, and when the crosshairs are on it or close, pull the trigger. Do not keep aiming, hoping your sight picture will get better. It won't.
Practice Makes Perfect
I've said it before, and I will say it again (because, unfortunately, too many clods don't listen to me). Get to the range and burn some ammo. Doing so will at least keep you from making the following four mistakes:
By David E. Petzal - (Story Source: Field & Stream - March 2010)
In 2006, After two weeks of slogging through the bogs of Southern Alaska, I finally got a chance to drop the hammer on a bull moose. The enraged ungulate was approaching at a rapid trot. I was out in the open, and if I moved, he would see me. This meant that as he came abreast I would have to mount the rifle, aim, and get the shot off in the space of a second or two before he figured out that something was amiss, or amoose, as it were. I did, and he learned too late that the best-laid plans of moose and men gang aft agley.*
What's the Rush?
Sometimes you have to shoot fast. Not only that, but you have to be able to hit what you're shooting at. Guides and outfitters whine that far too many hunters these days are no more capable of getting off a fast, accurate shot that they are of flying. One outfitter told me, as he approached apoplexy, "You work your butt off to get them a perfectly easy offhand shot, and they look around for a benchrest."
In areas where the game population is hunted hard, or where you will have to shoot at close range, you had best fire right smartly. On the other hand, there are places where the critters are more curious than concerned about humans. If you're one of the growing number of nimrods who shoot at over 300 yards, you probably have time for a leisurely first shot and two or three more as well.
Get in Touch With Your Inner Earp
Wyatt Earp, who died in his bed at 80, summoned up the art of fast shooting to perfection. When you slap leather, he said, you get your revolver clear of the holster just as fast as you possibly can, but then you take your sweet time aiming.
Translated into rifle shooting, this means getting the gun to your shoulder quickly, with no wasted motion, all the while keeping your eyes on what you want to shoot. Remember that you don't yank the stock straight up; you bring it forward, up and back in a short semicircle.
When you gun is up and you are aiming, you have to make a fundamental decision: How much time do I have? Experienced hunters can judge by an animal's behavior whether they have no time at all, or five seconds, or five minutes. Whatever time they think they have, they will take all of it.
If you're not an experienced hunter, it's better to assume you have no more than three seconds. So, pick a spot on the critter, aim for it, and when the crosshairs are on it or close, pull the trigger. Do not keep aiming, hoping your sight picture will get better. It won't.
Practice Makes Perfect
I've said it before, and I will say it again (because, unfortunately, too many clods don't listen to me). Get to the range and burn some ammo. Doing so will at least keep you from making the following four mistakes:
- Finding out the hard way that you can't shoulder your rifle because what you are wearing is so thick you can't get the scope close enough to get a sight picture.
- Sighting in your rifle with the scope on 10x and leaving it there instead of cranking it down to 4x.
- Forgetting where your safety is, or how it works, or that you even have a safety.
- Keeping the rifle slung over your shoulder, or worse, across your back.
Wednesday, July 20, 2011
How To: Buy A Gun Safe
A GUN SAFE is a major investment, and once it's installed you won't want to move it or get a new one. Which means you need to buy the right safe for you and put it in the right place. Here are a few things to consider:
The Size:
Figure how many gun slots you require. Every scope bolt gun in your collection gets two slots, other long guns get one. Multiply the total by 1.5 so your collection can grow.
The Specs:
Safes are rated for fire protection by time and temperature. The average house burns for 27 minutes at around 1,100 degrees. In rural areas where response is slower, you'll want additional protection.
The Space:
The best place for a safe is in a confined spot where intruders don't have room to attack the sides. It should be bolted to a floor that is strong enough to support its weight. While it's tempting to put it in the basement, chances are higher that your house will flood than burn or be broken into.
(Story Source: Field & Stream - Feb. 2011 - By Phil Bourjaily)
The Size:
Figure how many gun slots you require. Every scope bolt gun in your collection gets two slots, other long guns get one. Multiply the total by 1.5 so your collection can grow.
The Specs:
Safes are rated for fire protection by time and temperature. The average house burns for 27 minutes at around 1,100 degrees. In rural areas where response is slower, you'll want additional protection.
The Space:
The best place for a safe is in a confined spot where intruders don't have room to attack the sides. It should be bolted to a floor that is strong enough to support its weight. While it's tempting to put it in the basement, chances are higher that your house will flood than burn or be broken into.
(Story Source: Field & Stream - Feb. 2011 - By Phil Bourjaily)
Friday, July 15, 2011
The Wild Chef! - Mixed Bag Gumbo
THE CAJUN WAY TO CLEAN OUT A FREEZER
- By Jonathan Miles (story source: Field & Stream)
Gumbo is an example of Cajun cookery's prime directive: Waste not, want not. You can combine an almost infinite variety of proteins to create a soul-stirring, inexpensive dinner. If you bought a similar gumbo at one of New Orleans's best restaurants - Arnaud's - it would cost just under $8 per serving.
Ingredients:
Stock -
One large wild duck, or two small ones, cleaned an quartered; about 3 lb. mixed wild game (dove, squirrel, rabbit, quail, venison, goose, raccoon, etc., dressed and cut into manageable pieces); 1/2 cup vegetable oil; 1 onion, quartered; 4 celery ribs, roughly chopped; 4 carrots, roughly chopped.
Gumbo-
3/4 cup vegetable oil; 1/2 cup all-purpose flour; 1 cup chopped onion; 1 cup chopped green bell pepper; 1/2 cup chopped celery; 1/4 cup chopped scallions; 3 garlic cloves, minced; 1 lb. andouille or other smoked sausage, sliced into 1/2-inch thick pieces; 1 bay leaf; 1/2 tsp. dried thyme; 2 cups sliced okra; 1/4 cup chopped parsley
Prep:
1) Make the stock:
Preheat the oven to 400 degrees. In a large roasting pan, combine game with onion, celery, and carrots, an coat with vegetable oil. Salt and pepper generously, then place in the oven for 30 minutes. Transfer contents to a 2-gallon stockpot and add cold water to cover. Bring to a boil, then lower the heat and simmer, uncovered, for 1 1/2 hours. Remove and reserve the meat, picking out bones and fat. Strain the stock, discard vegetables and other solids, and return about 3 quarts of the strained liquid to the stockpot. Keep it simmering as you start the next step.
2) Make the gumbo:
Combine 1/2 cup of the oil and the flour in a wide, heavy skillet over medium-high heat, whisking constantly. As the mixture browns, keep whisking (to prevent the flour from burning) until it resembles chocolate syrup - about 3 to 4 minutes. Immediately add the chopped onion, bell pepper, celery, scallions, garlic, and sausage. Cook, stirring frequently, until the vegetables are wilted. Transfer the mixture to the stock and stir until evenly blended. Add the reserved meat, bay leaf, and thyme.
3) Make the okra:
Wipe out the skillet. Heat remaining 1/4 cup of oil until it simmers. Cook the okra, stirring, until it is no longer ropy and slimy. Add the okra to the stockpot and simmer, covered, for abour 1 1/2 hours. Add parsley, salt, and pepper and serve over white rice.
Serves 12.
- By Jonathan Miles (story source: Field & Stream)
Gumbo is an example of Cajun cookery's prime directive: Waste not, want not. You can combine an almost infinite variety of proteins to create a soul-stirring, inexpensive dinner. If you bought a similar gumbo at one of New Orleans's best restaurants - Arnaud's - it would cost just under $8 per serving.
Ingredients:
Stock -
One large wild duck, or two small ones, cleaned an quartered; about 3 lb. mixed wild game (dove, squirrel, rabbit, quail, venison, goose, raccoon, etc., dressed and cut into manageable pieces); 1/2 cup vegetable oil; 1 onion, quartered; 4 celery ribs, roughly chopped; 4 carrots, roughly chopped.
Gumbo-
3/4 cup vegetable oil; 1/2 cup all-purpose flour; 1 cup chopped onion; 1 cup chopped green bell pepper; 1/2 cup chopped celery; 1/4 cup chopped scallions; 3 garlic cloves, minced; 1 lb. andouille or other smoked sausage, sliced into 1/2-inch thick pieces; 1 bay leaf; 1/2 tsp. dried thyme; 2 cups sliced okra; 1/4 cup chopped parsley
Prep:
1) Make the stock:
Preheat the oven to 400 degrees. In a large roasting pan, combine game with onion, celery, and carrots, an coat with vegetable oil. Salt and pepper generously, then place in the oven for 30 minutes. Transfer contents to a 2-gallon stockpot and add cold water to cover. Bring to a boil, then lower the heat and simmer, uncovered, for 1 1/2 hours. Remove and reserve the meat, picking out bones and fat. Strain the stock, discard vegetables and other solids, and return about 3 quarts of the strained liquid to the stockpot. Keep it simmering as you start the next step.
2) Make the gumbo:
Combine 1/2 cup of the oil and the flour in a wide, heavy skillet over medium-high heat, whisking constantly. As the mixture browns, keep whisking (to prevent the flour from burning) until it resembles chocolate syrup - about 3 to 4 minutes. Immediately add the chopped onion, bell pepper, celery, scallions, garlic, and sausage. Cook, stirring frequently, until the vegetables are wilted. Transfer the mixture to the stock and stir until evenly blended. Add the reserved meat, bay leaf, and thyme.
3) Make the okra:
Wipe out the skillet. Heat remaining 1/4 cup of oil until it simmers. Cook the okra, stirring, until it is no longer ropy and slimy. Add the okra to the stockpot and simmer, covered, for abour 1 1/2 hours. Add parsley, salt, and pepper and serve over white rice.
Serves 12.
Thursday, July 14, 2011
Tips for the Outdoorsmen : The 45 Minute Rule
Story by Kevin Wilson (Alberta Outdoorsmen Magazine)
Perfect arrow or bullet placement will collapse game on the sport or within 50 metres of the point of impact. That said we all know a good percentage of game falls victim to less than perfect shot placement. In these instances it's wise to evaluate and act accordingly.
Allow me to illustrate with the events of a a recent hunt. A few weeks ago I was bow hunting mule deer in northern Alberta. With an extra antlerless tag in my pocket, I capitalized. Sneaking in to close range, the wind was in my favour. I ranged the lone doe at 40 metres. Totally unaware that I was there, she had her head down. Just like shooting at the 3D range, I drew back, took my time, locked my sight pins on her chest and released. My arrow entered in the bottom 1/3 of the chest just behind her shoulder and, because she was quartered slightly toward me, it exited half way back on the opposite side of the torso. Jumping and then trotting toward me, she clearly didn't know what had happened. The doe covered about 30 metres, slowed and immediately bedded down in the standing canola. Some distance away my partner was observing through his binoculars from a high point. As I looked toward him, he motioned that her head was still up so I backed away and joined him. For 25 minutes we watched intently and finally her head dropped. My partner was convinced it was done, but I was skeptical. I've been bow hunting for nearly 20 years and I've seen just about everything there is to see when it comes to arrow wounds. The one thing I know for certain is that every shot is different and unless you play your cards right, you stand to lose any game that isn't hit through the vitals. Sound decision-making is critical and in this instance I was tempted to bend the rule to erroneously appease my curiosity.
Arrow placement had been nearly textbook but because the doe was slightly quartering toward me, i guess I'd only taken out one lung and passed through the diaphragm and liver. Long story short, we opted to approach slowly. With another arrow nocked I went to full draw and covered the last 20 metres with the notion of launching a finishing shot if necessary.
By all appearances she was down for the count. Then, all of a sudden she sprang to her feet and bolted. Clearly weak but in a last-ditch effort to escape, she managed to make it to the nearby willows. Dumbfounded to say the least I could hardly believe my eyes. I remember reprimanding myself for not waiting the 45 minutes! I knew to wait it out but I opted to push it. Well, to make a long story short, minutes later I walked up on my doe and she'd expired almost immediately upon entering the small bluff. Despite the significant trauma inflicted by a fixed 4-blade Muzzy broadhead passing through her torso, my deer still had enough life to get up and go after 30 minutes.
So, what's the moral of the story? In retrospect, this was a lesson for me and should be for all of us. Sad but true, far too many bow hunters, not to mention gun hunters, lose games each year because they fail to wait before following up on their shot. I remember watching an elk hunting video produced by famed bow hunter Larry D. Jones almost 20 years ago. Following a less than ideal hit, he and partner Dwight Schuh were adamant about waiting at least 45 minutes before following up on the shot. I'm normally militant about this rule myself, even if I've made a good hit. Why did I break the 45 minute rule? Basically because we had seen her head go down. Was it the right decision? Absolutely not! We all get excited in the heat of the moment. We're anxious to collect our prize, but in the end it's all about making the right decisions; decisions that will inevitably determine the outcome of our hunt.
Source: Alberta Outdoorsmen Magazine
Subscribe to:
Posts (Atom)